123 Street Avenue, City Town, 99999

(123) 555-6789

email@address.com


You can set your address, phone number, email and site description in the settings tab.
Link to read me page with more information.

Blog

Filtering by Category: a guest

pinned it. did it. {with doña}

liz lamoreux


Note from Liz: I'm so happy to share that Meg, who is a frequent "Pinned it. Did it." contributor here on my site, had her baby on Monday! Mama and baby girl are doing well! Meg will be taking a break from guest posting for a bit but will be back later this summer.

And I'm happy to share that my friend Doña is going to share a few columns with us over the next few weeks! First up is her gorgeous natural-dyed eggs DIY. Oh my goodness these are gorgeous! Read on for her column...

*****

Last Easter we had cousins visiting from England. Did you know in England they don’t dye eggs like we do in the US? Instead they decorate them with markers and stickers. Last year I made sure we had an Easter egg dyeing day, so my young cousin could experience the American way of colored eggs. Unfortunately the experience was a little disappointing, at least for me. The dyes from the little tablets I dissolved in water and vinegar just weren’t very vibrant. Yet the mess they left on my counter was epic.

This year I wanted to try something different. I’ve always been intrigued by natural, vegetable based dyes and I’ve seen some really gorgeous colors on yarn and fabrics dyed this way. So when I came across a few images of vegetable-dyed Easter eggs, I knew that’s what I wanted to try. 

There’s something just so appealing to me in these natural hues. I picked one post that had good, clear instructions and collected all of my ingredients together. I wanted a range of colors, so I used red cabbage (for blue), skins from brown onions (for dark orange), turmeric (for yellow), beets (for red), and a combination of carrot tops and parsley (for green).


Full disclosure here - I didn’t involve my 3-year-old in this process at all. I wanted to do a “dry” run to make sure it worked and also to figure out how messy it was going to be (it was messy - my butcher block has a big red beet circle!). I started the whole process, including hard-boiling the eggs - after she went to bed one night this week. I also wanted to test out what I’ve discovered is the most important tip for dyeing eggs with vegetable dyes - let them sit in the color over night. 

The whole process went surprisingly fast, even though the color pots all needed to be simmered for 30 minutes. I just used all the saucepans and burners I had!

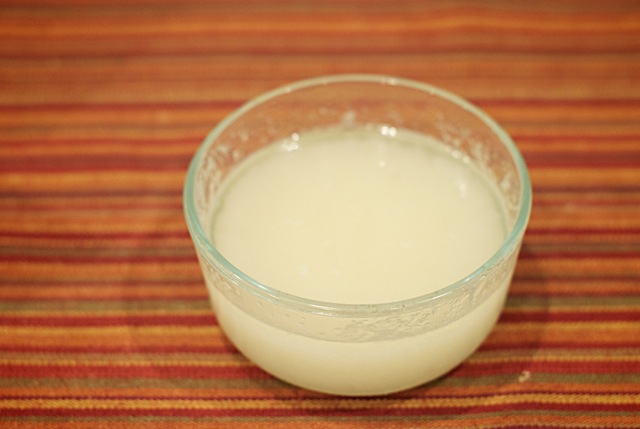
By morning I had this - success!


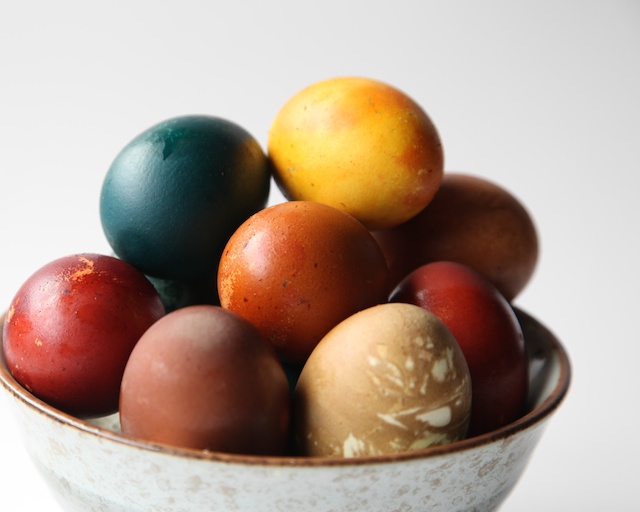
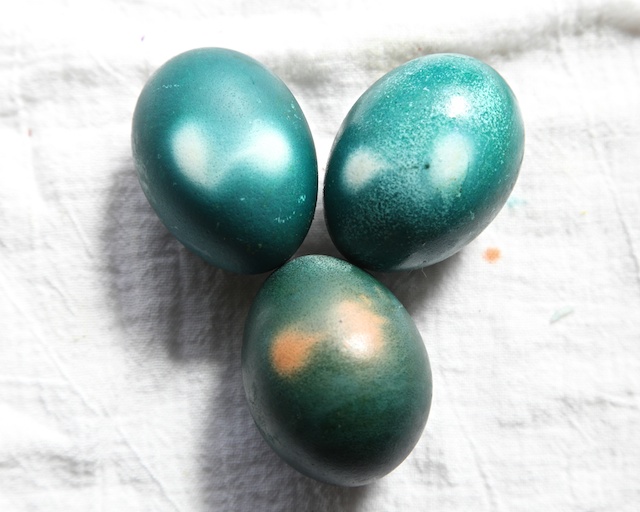
I used both brown and white eggs. I thought there would be more difference in the final colors, but the difference is actually pretty subtle. The only color that didn’t really work was the yellow/green from the carrot tops and parsley. The color is barely yellow green and very light. Though I really love the pattern the leaves left on the shell.


I am so impressed with the depth of the dye saturation with this method. It is really obvious here, where part of the egg was not completely covered by the dye water.


I’ll definitely be doing this method of egg dyeing again. I also saved the bowls of colored water and I’m going to try dying some natural-colored sock yarn in the remaining dye to see how the colors turn out. 

You can find all the pins I’ve collected for vegetable dyed eggs as well as other fun egg decorating methods on my Spring pinboard on Pinterest. Follow me on Instagram see the yarn dyeing results and to see what other fun Easter crafts we come up with! 

Doña Bumgarner is a writer, artist, mama and a craft project-collector from way back. She loves Pinterest and uses it to help solve a household dilemma at least once a week (see her “pinned and done” board). She lives in Santa Cruz with her partner, their little one and his almost grown one, and a collection of cats and chickens. She writes about the practice of moms holding space for their own well being in the midst of raising a family on her blog, Nurtured Mama.  

Note from Liz: Over here in my corner, I'm trying to "use Pinterest for good." I really see it as a community of people trying to see the beauty and possibility in their lives. I'm adding a few new features here on my blog inspired by or directly about Pinterest as a way to invite others to look for this beauty within a social media community. Connect with me on Pinterest here. Read other "Pinned it. Did it." columns here.

pinned it. did it. {with meg}

liz lamoreux


Meg is back with another Pinned it. Did it. post. There are so many awesome DIY ideas out there for bath scrubs and love having this recommendation from Meg. If you try it or have another one you love, let us know in the comments.

Meg writes:

I happen to fall into the large portion of the population that suffers from Keratosis Pilaris - tiny red bumps on the backs of my arms. Ive had it come and go since I was a teenager and have finally found something that seems to help. I love how many smart ideas I come across on Pinterest that I might otherwise not find. This sugar scrub is one of those things. 

Ive been using this scrub for over a month now and am starting to see a decrease in the red bumps on my arms. Im hopeful that there will be a huge improvement by summer when I like to have bare arms. It is certainly not a quick fix, but I love how natural it is and how easy it is to personalize. I think it would make a great DIY gift for anyone to pamper their skin. 

I used avocado oil and coconut oil, white sugar, and a calming blend of essential oils. Its recommended in the comments of the original post to not use 100% coconut oil (unless its fractionated) because it solidifies at room temperature. Ive been doing a lot of reading about different essential oils that I could try in my next recipes of sugar scrub. I love how easy it is to personalize or experiment with. The scrub itself is so easy to make. Its as simple as covering a scoop of white sugar with an oil of your choice (olive oil, avocado oil, coconut oil, sweet almond oil are some that come highly recommended), and then adding a few drops of essential oils of your choice. You could also leave the oils out for a fragrance-free option for anyone with sensitivities.

Im enjoying feeling a bit pampered while I wait for baby to arrive in April. Its funny how something so simple can feel like self-care and a pick me up in the winter days were having. Its like having a hint of a spa indulgence at home. What ways do you like to indulge or pamper yourself with for some luxurious self-care? Tell us about them in the comments! Id love to hear. 


Meg Brothers is an artist, photographer, mama, and dreamer. She loves cooking, tattoos, and sporadic dance parties in the kitchen. She prefers dark chocolate, black coffee, and flip flops when weather permits. She is a lover of Pinterest and truly believes in integrating ideas and inspiration - big or small - into normal life. Meg lives in Denver, Colorado with her husband, Dustin and son, Julian. Meg writes about photography, family, and creative inspiration at megbrothers.com. Find her on Pinterest here and on Twitter here

***

Note from Liz: Over here in my corner, I'm trying to "use Pinterest for good." I really see it as a community of people trying to see the beauty and possibility in their lives. I'm adding a few new features here on my blog inspired by or directly about Pinterest as a way to invite others to look for this beauty within a social media community. Connect with me on Pinterest here. Read other "Pinned it. Did it." columns here.

pinned it. did it. {with meg}

liz lamoreux

Meg is back with another DIY she found on Pinterest. Ellie would love this! And I think it would appeal to the science teacher in Jon. Might be a perfect thing for them to do this weekend. Thanks Meg!

*****

The cold January weather has brought us the most lovely snow flurries this morning. When we look out the window, it looks like a snow globe in our neighborhood. Its a comforting type of snow. Not a run out to the grocery store and stock up on staples type of snow. And with the windchill outside, its too cold to take my son out to play. So we pulled up my Pinterest board where I pin Kid Crafts and Activities and picked a fun indoor activity. Ive been eyeing various homemade play dough recipes and we settled on a no-cook version that uses our essential oils.  

A perk to using a no-cook method, was that my son, Julian, was able to help measure and pour (all except the boiling water). This recipe requires few ingredients that are all non-toxic and chemical free. 


I split our dough into three portions so that we could have three different scents of dough. We are really loving using essential oils in our house and I love the therapeutic qualities it adds to an already therapeutic and soothing activity. We used Wild Orange, Lemon, and Eucalyptus. I used food-grade gel food coloring (which left a tiny reminder of our adventure behind on my hands - perhaps rubber gloves for that part in the future?). And we substituted coconut oil for the vegetable oil since thats what we have in the house. The texture of this dough is so soft and silky which I love. I was worried that the use of salt would make it gritty but it ended up so soft and smooth like the store-bought versions. 


My summer-born baby is an outdoorsy boy and I always struggle through the coldest parts of the winter to keep him inside. We venture out when we can, but its days like today that Im so thankful for the Pinterest goodness of toddler activities and ideas galore. How fun it is to scroll through my board together and select an activity for the day. 

What type of winter day activities are filling your days? Wed love to hear about how you are spending your cold, winter days and if you are using Pinterest for ideas. Tell us about them in the comments below.


Meg Brothers is an artist, photographer, mama, and dreamer. She loves cooking, tattoos, and sporadic dance parties in the kitchen. She prefers dark chocolate, black coffee, and flip flops when weather permits. She is a lover of Pinterest and truly believes in integrating ideas and inspiration - big or small - into normal life. Meg lives in Denver, Colorado with her husband, Dustin and son, Julian. Meg writes about photography, family, and creative inspiration at megbrothers.com. Find her on Pinterest here and on Twitter here

***

Note from Liz: Over here in my corner, I'm trying to "use Pinterest for good." I really see it as a community of people trying to see the beauty and possibility in their lives. I'm adding a few new features here on my blog inspired by or directly about Pinterest as a way to invite others to look for this beauty within a social media community. Connect with me on Pinterest here. Read other "Pinned it. Did it." columns here.

pinned it. did it. {with meg}

liz lamoreux

I'm delighted that Meg is sharing about a group of creative kindreds she gathered with over the weekend to just have some girl time. And lucky for us, she's sharing about the bread she made for the occasion. She finds the best recipe pins!

*****

Over the weekend, I had the opportunity to gather with some friends who I knew/made while Jen Lee was in town touring with her documentary, Indie Kindred. These ladies, in a few short get-togethers, have become very dear to me as kindred spirits and fellow creatives. We sat and ate delicious “brunchy” foods and pulled out knitting needles and crochet hooks (most of us had to work just to remember what to do with them because it had been so long since the last time we’d picked them up). But just the act of gathering together feels so sacred and so special. We love to chat and scheme about how we are going to collaborate or plan our dream events and who we can meet along the way. Having this community is invaluable. We even scheduled our next “knitty brunch” date before we left so another one is already in the works. Magic, I tell you.

I have a whole breakfast board on Pinterest filled with decadent and delicious ideas for such a brunch. But I’d seen a pin that stuck out in my mind and knew it was the one I wanted to make to take with me to our get together. A huge perk to baking it was that it would satisfy quite a few different diet restrictions (gluten-free, vegan, dairy-free). 

This bread is delicious. And smothered in chocolate. But to warn you, it is quite rich. The use of peanut butter and chocolate chips make it perhaps more dessert-like than breakfast-like. I think you could cut way back on the chocolate chips or replace many/all of them with nuts or dried fruit for a different take on it. But I went full-force on the chocolate chips (I used these) and found it decadent and wonderful. 

The batter is very thick but it bakes up beautifully. A few tricks I learned while making this bread: 1) add a few tablespoons of water while blending to get a wetter batter, 2) let it cool completely before turning it out of the pan or it will fall apart, 3) use two small loaf pans OR one large loaf pan, and 4) have a beverage nearby when eating it. It’s a bit dense and all that peanut butter will make you thirsty!

So many good things coming from my Pinterest boards lately. Have you been doing anything from your Pinterest boards? Share about your Pinterest inspirations in the comments or leave a link for us to see. 


Meg Brothers is an artist, photographer, mama, and dreamer. She loves cooking, tattoos, and sporadic dance parties in the kitchen. She prefers dark chocolate, black coffee, and flip flops when weather permits. She is a lover of Pinterest and truly believes in integrating ideas and inspiration - big or small - into normal life. Meg lives in Denver, Colorado with her husband, Dustin and son, Julian. Meg writes about photography, family, and creative inspiration at megbrothers.com. Find her on Pinterest here and on Twitter here

***

Note from Liz: Over here in my corner, I'm trying to "use Pinterest for good." I really see it as a community of people trying to see the beauty and possibility in their lives. I'm adding a few new features here on my blog inspired by or directly about Pinterest as a way to invite others to look for this beauty within a social media community. Connect with me on Pinterest here. Read other "Pinned it. Did it." columns here.

pinned it. did it. {with meg}

liz lamoreux

Today, Meg is sharing just about everything you need to create a very special DIY New Year's Party. Love that these ideas would work for a party for 2 or 22. Read on for Meg's post.

*****

I will admit that I am a softie for a fun New Year’s celebration. I love the idea of getting all dressed up fancy and going out to celebrate the ringing in of a new year. I also love staying in and making a fun party at home. That’s what New Year’s will look like this year with a 2.5 year old at home and myself 5 and a half months pregnant. I’ve had so many ideas pinned on my Holiday board that I’ve been excited to do. We took down our Christmas decorations and put up some New Year’s decorations all in the same day. Sometimes it feels challenging to want to decorate for one holiday when it’s so close to another. Often times our Christmas decorations are still up on New Year’s Eve. But this year they came down as soon as Christmas was over so that we could get in the spirit for a new year to come. 


I modified a tutorial for making sparkly stars to hang from my mantle place. I didn’t want to hassle with glue and glitter, so I purchased scrapbook paper that was glittery with both silver and gold glitter. I made a free-hand star and cut out 9 to hang across the mantle. I used a needle and thread to hang them with string and simply just taped them to the top of my mantle. The only change I would make next time around is I’d either use double-sided paper or I’d cut enough to make them sparkly on both sides. They spin with a little air movement and I think it would be fun to have them sparkly on both sides.

I used the same scrapbook paper and cut out circles (free-hand again) of varying sizes and used a tiny hole punch to be able to string them on baker’s twine. I loved the look of this circular garland and decided to fashion one for one of our very large living room windows. I made two strands and hung them at varying lengths. It adds a fun touch of sparkle to the room. 


Then I cut out some stars to embellish our champagne glasses and the food on the table. Some of them I attached to glassware and others I taped to toothpicks to add to brie and to some hummus. These little stars were inspired by a photo I saw for Blackberry Goat Cheese Crackers. What a yummy appetizer they would make! 


I also made some Spritz cookies which are a Christmas tradition in my family. This year I made them for New Year’s and used some silver sparkly sprinkles to decorate them. You can find the recipe that my family has used for generations over on my blog


And last of all, we will top off the New Year’s celebration with New Year’s Eve Popcorn. It follows the same recipe and process as the Party Popcorn that we’ve told you about in the past. But this one uses silvery sprinkles and these edible stars by Wilton. This popcorn is so incredibly festive! 

There are so many more ideas I’d love to explore for a New Year’s party. Here are a few of my favorites:

DIY Cheeky New Year’s Eve Party Favors + Printable Tags
White Chocolate Dipped Cherries
Metalic Bunting
DIY Confetti Poppers 
Drink Stir Sticks
DIY Mini Hat Headband
Midnight Kisses

Do you have fun plans for New Year’s Eve this year? I’d love to hear about your plans and parties and how you like to ring in a new year. Are you making things for a party or are you keeping it quiet this year? Share your ideas with us in the comments. Best wishes for a happy and healthy new year to you all. XO


Meg Brothers is an artist, photographer, mama, and dreamer. She loves cooking, tattoos, and sporadic dance parties in the kitchen. She prefers dark chocolate, black coffee, and flip flops when weather permits. She is a lover of Pinterest and truly believes in integrating ideas and inspiration - big or small - into normal life. Meg lives in Denver, Colorado with her husband, Dustin and son, Julian. Meg writes about photography, family, and creative inspiration at megbrothers.com. Find her on Pinterest here and on Twitter here

***

Note from Liz: Over here in my corner, I'm trying to "use Pinterest for good." I really see it as a community of people trying to see the beauty and possibility in their lives. I'm adding a few new features here on my blog inspired by or directly about Pinterest as a way to invite others to look for this beauty within a social media community. Connect with me on Pinterest here. Read other "Pinned it. Did it." columns here.

pinned it. did it. {with meg}

liz lamoreux

Meg is sharing about one of my favorite things: bunting! There is so much great inspiration for these kinds of flags on Pinterest and I love the variety Meg shares with us today.

*****

I may be a little obsessed with making these bunting flags. There are some easy tutorials on Pinterest but once you get the basic idea, they are easy to elaborate on and change to make personal. It’s amazing how festive a little banner can make any event or any room for decoration. They are just so cheerful. 

I made the one pictured above for my son’s bedroom. I used fabric and sewed it with bias tape. I started with a cardboard template for the flags and just measured the wall to know how many to make. I folded bias tape over the top edge and sewed along the edge. This is a nice way to make the banners with fabric and provides a nice edge. I hang it on the wall with some small push pins. 


I made this “Be Merry” one for our fireplace for Christmas this year (I am also a portrait photographer and used it as a photography prop in some holiday photos this year). This one used twine and burlap. I bought alphabet stencils and white paint and stenciled the words onto the burlap. I used a strong glue to glue the flag around the burlap since I didn’t want there to be any lines on the flags. These were a smaller triangle. I love how it’s festive but simple. 

Today I sat and made this mini bunting flag for a Christmas gift for my niece. It’s small enough to use as decoration with her My Generation doll (similar to an American Girl doll). For this one I used fabric flags and instead of cutting triangles, I cut diamonds. I then folded the diamonds over a piece of yarn and glued so they would be sturdy and decorative on both sides. I am so in love with the way it turned out (and those colors!) and love the touch of fun that the green pompom ribbon adds. 

Other flag inspiration ideas: 

Cake topper bunting flag
Tissue tassel banner flag
Washi tape banner flag
Chalkboard bunting banner

I have so many DIY projects lined up for my home. I’m feeling really inspired lately to adorn the walls with photos I’ve taken and art I’ve made. It’s amazing how adding a few homemade touches makes my space go from feeling good to great.

Have you been doing any fun DIY projects lately? Tell us about them! I love to hear about what you are up to these days. Share in the comments today.


Meg Brothers is an artist, photographer, mama, and dreamer. She loves cooking, tattoos, and sporadic dance parties in the kitchen. She prefers dark chocolate, black coffee, and flip flops when weather permits. She is a lover of Pinterest and truly believes in integrating ideas and inspiration - big or small - into normal life. Meg lives in Denver, Colorado with her husband, Dustin and son, Julian. Meg writes about photography, family, and creative inspiration at megbrothers.com. Find her on Pinterest here and on Twitter here

***

Note from Liz: Over here in my corner, I'm trying to "use Pinterest for good." I really see it as a community of people trying to see the beauty and possibility in their lives. I'm adding a few new features here on my blog inspired by or directly about Pinterest as a way to invite others to look for this beauty within a social media community. Connect with me on Pinterest here. Read other "Pinned it. Did it." columns here.

pinned it. did it. {with doña}

liz lamoreux

I'm delighted to welcome another guest today. Doña Bumgarner is sharing a fantastic project she did with her little one this fall. As we look toward winter around the corner, it would be fun to create these salt dough ornaments with snowflakes or other winter-themed shapes.

Thanks for such a great project Doña and for sharing some great resources below.

***

My daughter is not quite 3 years old and this month she quit napping.  It has been a hard transition for both of us and the middle of the afternoon often finds us both exhausted and mean.

On one such afternoon, when the stretch to dinner and bedtime seemed interminable, I turned to Pinterest for inspiration.

I have few boards of activities for little ones, but on this day I remembered reading something about using sensory input to calm overwrought toddlers, so I pulled up the sensory activities board.  I needed a project that didn’t require a trip to the store, because there was no way we were going to manage that.

Salt dough leaf ornaments.  Perfect. Easy to make, short list of ingredients and supplies, and fast.

I pulled out the mixing bowl and flour jar and Bean came running into the kitchen to see what I was doing. She loves to help me cook (and I try to let her, even when it takes much longer) so she was immediately hooked. And then when I told her she could mix the dough with her hands? She was in heaven.


The dough was warm from the water and the texture was similar to the Play Doh that she loves. And the impact was immediate. As soon as she got her hands in that bowl I felt her energy unwind. It was magic. She tasted it and smelled it and told me it felt soft and squishy in her hands.

I let her mix as long as she wanted, and then I divided the dough while she picked the dye colors. The original recipe used powdered tempura paint, which I didn’t have, so I substituted food coloring. This didn’t work very well and stained my hands, so if you try this at home, use the powdered paint as suggested or mix the color into the water before making the dough. She likes purple, so along with the standard leaf colors, we made a ball of purple dough.

I helped her roll out and cut the shapes and that was about the end of her interest for the day. I settled her with a TV show while I finished up by poking holes in the leaves for hanging and put them in my dehydrator to dry. You can also use an oven set on low for this step.

She was so excited about the leaves we’d made and showed them to her father as soon as he got home from work.


The rest of the project was split over a few days, continued whenever she indicated interest. One night after dinner we painted the leaves with Mod Podge (I highly recommend their washable version when you are crafting with little kids!). Another afternoon we went for a walk around the neighborhood to find a branch to hang them on. 


Then two or three ornaments at a time, because this part was more frustrating for her, we cut lengths of thread and hung them on our branch, which adorned our kitchen counter for a few days until our boy cat decided it was fun to play with.

What I loved about this project was that it was so simple and so accessible. I also loved that it gave us something to come back to over the course of a week. But the best part was it reminded me that when Bean is having a really rough day I can try to bring her back to center by introducing a project that engages her senses. That’s an awesome mama trick to keep in my back pocket.

If you’d like to see the other sensory activities I have pinned, that board is here. You can also check out my boards for arts and crafts with kidseducational play, and self-directed toys and busy bags

***

Doña Bumgarner is a writer, artist, mama and a craft project-collector from way back. She loves Pinterest and uses it to help solve a household dilemma at least once a week (see her “pinned and done” board here)  She lives in Santa Cruz with her partner, their little one and his almost grown one, and a collection of cats and chickens. She writes about the importance and struggles of moms with little ones to hold space for their own well being in the midst of raising a family on her blog, Nurtured Mama

Note from Liz: Over here in my corner, I'm trying to "use Pinterest for good." I really see it as a community of people trying to see the beauty and possibility in their lives. I'm adding a few new features here on my blog inspired by or directly about Pinterest as a way to invite others to look for this beauty within a social media community. Connect with me on Pinterest here. Read other "Pinned it. Did it." columns here.

pinned it. did it. {with meg}

liz lamoreux

Meg's sharing another recipe today! It's perfect for this time of year and for those of us who want to try cooking without gluten but keep wondering if what we make will really taste as good as we hope.

****

It’s no secret that I like things made with pumpkin. And with it being the holiday season and just after Thanksgiving here in the U.S., I’m tempted to have a pumpkin treat each day. It just seems festive and appropriate. So I decided to start with a recipe that I’ve been wanting to try for a long time now - and I am so glad I did.


These pumpkin mini muffins are grain-free. They are also dairy-free and refined sugar-free. I admit to being a bit skeptical of the end result. As someone who has been in and out of various dietary restrictions over the years, I have had my fair share of disappointing baked goods. However, I was thrilled at the outcome of these muffins. They are incredibly soft, fluffy, spongy, and bare no resemblance to any dense or gritty grain-free recipe I’ve tried thus far. I would serve these to anyone and am willing to bet that no one would realize that they are not the typical flour and sugar made muffin. 

In our house, we love Justin’s Almond Butter**. In this recipe, I used the honey almond butter. The end result has a very subtle nutty taste, much less noticeable than if I’d used peanut butter. We did not have mini chocolate chips on hand, so we sprinkled the tops of a few with regular chocolate chips. (Keep in mind if you are dairy-free or have allergies, you will obviously need to use something like the chocolate chips made from Enjoy Life. They are dairy, nut, gluten, and soy free). These muffins are also delicious without the chocolate chips. They would be great with the addition of chopped nuts or a touch of cream cheese-type filling. There are so many possibilities for expanding this recipe. 


They whip up with only 8 ingredients (9 with the chocolate) in the blender and bake at a very quick 7-8 minutes. They also keep nicely in the freezer for up to 4 months. I will be baking a few batches at a time and freezing them for a quick breakfast in the cold months to come. 

What pumpkin goods have you been making lately? Are you enjoying the pumpkin season as much as I am or are you someone who doesn’t care for it? Wishing you all in the U.S. a happy Thanksgiving this week and sending love to our readers all around the globe.  

**This almond butter can be expensive. We find really good deals at regular grocery stores and health food stores. I got two 16oz jars on a buy one get one free sale at my regular grocery store for $10 so be sure to watch the sales!**


Meg Brothers is an artist, photographer, mama, and dreamer. She loves cooking, tattoos, and sporadic dance parties in the kitchen. She prefers dark chocolate, black coffee, and flip flops when weather permits. She is a lover of Pinterest and truly believes in integrating ideas and inspiration - big or small - into normal life. Meg lives in Denver, Colorado with her husband, Dustin and son, Julian. Meg writes about photography, family, and creative inspiration at megbrothers.com. Find her on Pinterest here and on Twitter here

***

Note from Liz: Over here in my corner, I'm trying to "use Pinterest for good." I really see it as a community of people trying to see the beauty and possibility in their lives. I'm adding a few new features here on my blog inspired by or directly about Pinterest as a way to invite others to look for this beauty within a social media community. Connect with me on Pinterest here. Read other "Pinned it. Did it." columns here.